

Developers
The below JavaScript commands are only supported while using the PayServices Browser.
Secure Browser
Command: PSBdoGetListCardReaders();Get the list of connected card readers. |
Return command: callPSBdoGetListCardReaders();Returns and array of readers where the array key contains the name of the reader. For example: [0] => "IC Reader", [1] => "NFC Reader", [2] => "...". The array key i.e. "1" is later used in subsequent commands to specify which reader. |
Command: PSBdoCheckCardReaderConnected(readerID);Know if a compatible card reader is currently connected. In the function it is possible to pass the readerID which is the array key returned in PSBdoGetListCardReaders(); If no readerID parameter, the system will default to the key 0. readerID: |
Return command: callPSBdoCheckCardReaderConnected();Returns "true" or "false" |
Command: PSBdoCheckCardIsInserted(readerID);Know if a card is currently inserted in the compatible card reader. readerID: |
Return command: callPSBdoCheckCardIsInserted();Returns "true" or "false" |
Command: PSBdoCheckCardType(readerID);Gather the type of card currently inserted in the compatible card reader. readerID: |
Return command: callPSBdoCheckCardType();Returns "false" if no reader/card present. Returns the card type if present such as: PAYSERVICES / BEID / MASTERCARD / VISA / AMEX / DISCOVER / DINERS / ... |
Command: PSBdoGetCardDetails(readerID);Gather the card details of the card currently inserted in the compatible card reader. readerID: |
Return command: callPSBdoGetCardDetails();The response will be an array containing the card's data in json format |
PSBdoPrintURL(url);Open print dialog after downloading content from the url. Supported formats: PDF, JPG, TIFF, GIF, PNG, TXT url: |
Return command: callPSBdoPrintURL();Returns "true" or "false" |
Capture PayServices TokenThe idea here is that if an input text with id="payservicesToken" is detected on the webpage, the browser inserts in that input text (which will normally be hidden on the page type="hidden") a temporary token for the session. |
Server agent
Presentation
The server agent by PayServices is an infrastructure application offered in the form of a Software as a Service (SaaS) with an active subscription in your account.
The application is designed to support three core functions and capabilities:
1. Asset Inventory Management (AIM)
This allows your organization to create a real-time inventory of the servers and computers inside your organization. The inventory is generated automatically by the application; gathering all core technical information about the asset, including notably: hardware specifications and software list.
2. Monitoring.
This part requires to install the application as a service running in the background processes. Once installed, the application runs scan reports of the system at specific time intervals, but also when events occur based on pre-determined rules (e.g. the cpu usage passes 80%).
3. Impact analysis.
The impact analysis is a powerful feature of the application which enables your organization to learn and architecture your servers' network and understand what service is impacted when one of the servers goes down. This is done by manually designing your architecture in the online platform, aided by the server agent which gathers intelligence about network connections for example.
Installation
Installation of the server agent is simple and requires a minimal amount of time per server (about 5 to 10 minutes per machine).
The server agent application was designed to be lightweight, efficient, and non-invasive. No SFTP or SSH keys are required to be created. The server agent communicates with the PayServices online platform via standard tcp protocol on a dedicated HTTP server on SSL port 443. The address of the server with which the application communicates (for your own firewall configuration) is: https://app-server.payservices.com. Note: your local firewall only needs outgoing connections permitted to the PayServices collection server.
Installation:
Step 1. Download the server agent app for your server.
Two operating systems architectures are supported: Microsoft Windows and Linux.
Step 2. Run as an administrator.
On Windows, open the "Windows PowerShell" and run it as an administrator. Go to the folder where the installation program is located. For example: "cd \Users\Mike\Downloads" Once in the folder, simply run the program with the command ".\[type executable name here]" In some instances, run using the command "Set-ExecutionPolicy Unrestricted .\[type executable name here]"
On Linux, open the terminal as a root or sudo user and run the program using the command "./[type executable name here]".
Once that you run the application, in the command line, you will be prompted with a screen similar to the following:
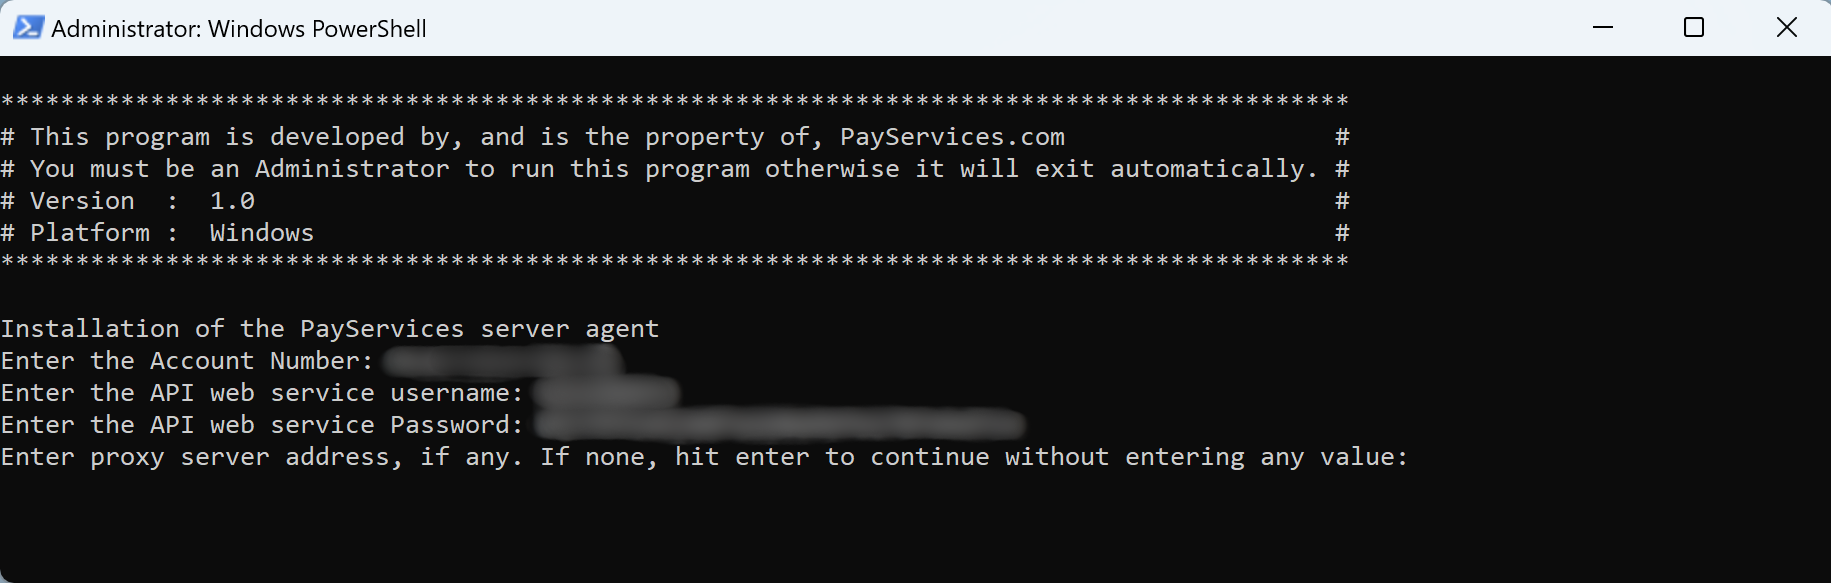
To find what is your user account:
- Go to the online platform.
- Select the account for this installation.
- Look in the top right corner for your account number. Alternatively you can go to "Profile" under "Settings" to find your account number.
To find your API web service credentials:
- Go to the online platform.
- Select the account for this installation.
- Go to "Defaults" under "Settings" and navigate to the "API webservice" tab.
Note: application also supports a proxy server. If your instance for example is in a private network without a direct access to a public network, you may route scan reports via a secure proxy server installed locally within your network.
Step 3: License configuration.
The server agent application requires a valid license to run. The license is acquired through a subscription in your account. The subscription can be configured through the online "Market" under "Marketplace".
In the event where you have an existing license, you may manually configure it. For this, simply follow the instructions in the command line.
At this moment, the server agent will create a configuration file locally in your server that contains the necessary license information for the application to run on your server. Note: in some instances, it is possible to download this configuration file from the online platform, for example if you intend to run the server agent on a machine that does not have any network connection. If that was the case, when running the application for the first time, the program will detect a pre-existing configuration file and will ask you if you want to use it or not.
How to use
Usage of the server agent is done through a simple menu which appears in the command line.
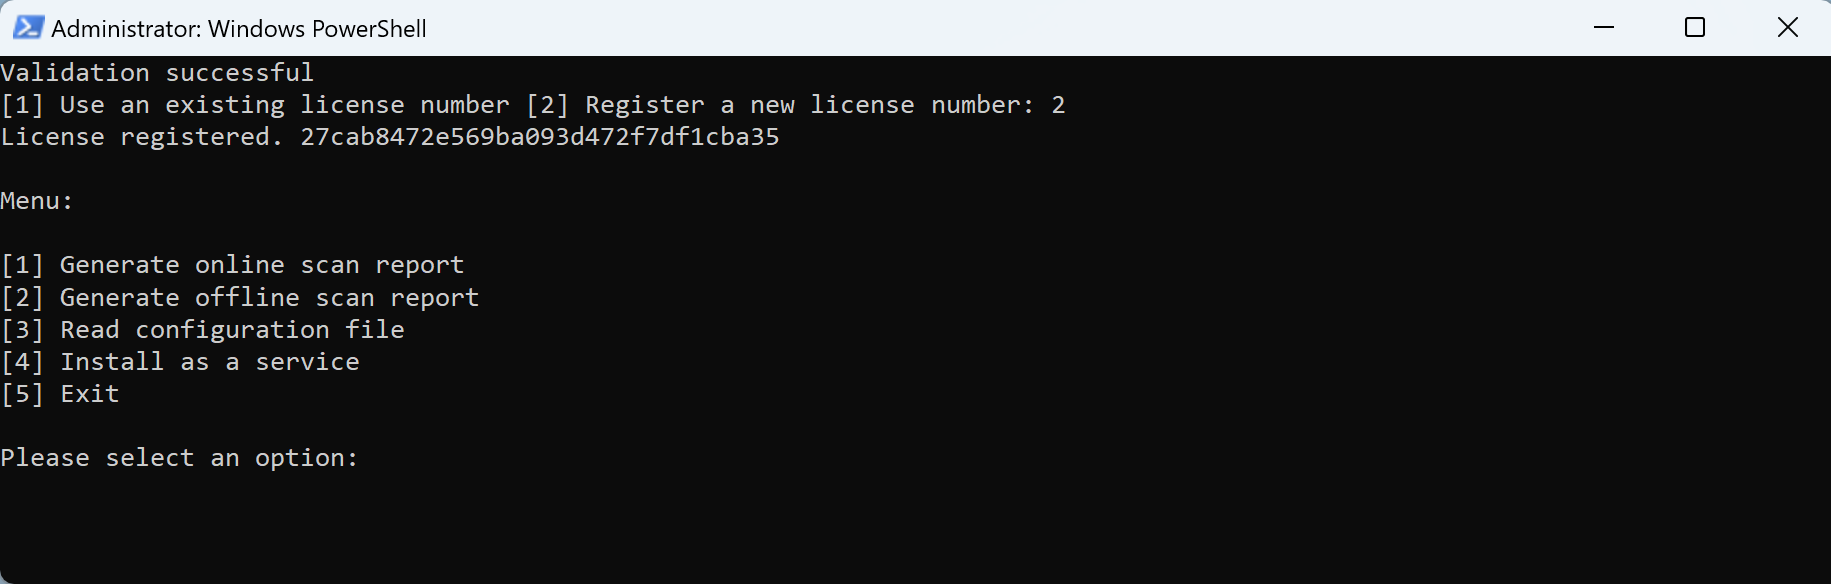
There are 5 options in the menu:
Option 1: Generate online scan report.
This options allows you to manually ask the machine to generate a scan report and send it to the PayServices collection server for real-time processing of the latest scan report.
Option 2: Generate offline scan report.
This option allows you to manually generate a scan report file. The file is encrypted and allows you to manually download it from the local server and then manually upload it in the online platform for processing. For example: if you are running the agent on a server that does not have any network connection. For this to work, the server agent would require to be installed using a configuration file that you would download from the online platform.
Option 3: Read configuration file.
This option allows you to manually read the configuration files' contains which will display on the screen, in the command line, your API credentials along with your license number and license expiration date.
Option 4: Install as a service.
This option allows you to install the server agent application as a background service. Should you select this option, within a few moments, the installation will be complete and the app will be running as a background service on your server; periodically uploading scan reports and behaving based on pre-configured sets of parameters in your account in the online platform.
Option 5: Exit.
This option is simply to exit the menu of the application and release the command line.